The PFX![]() A PFX file (personal information exchange format), also known as a PKCS#12 archive, is a single, password-protected certificate archive that contains both the public and matching private key and, optionally, the certificate chain. It is a common format for Windows servers. Enrollment
A PFX file (personal information exchange format), also known as a PKCS#12 archive, is a single, password-protected certificate archive that contains both the public and matching private key and, optionally, the certificate chain. It is a common format for Windows servers. Enrollment![]() Certificate enrollment refers to the process by which a user requests a digital certificate. The user must submit the request to a certificate authority (CA). page provides the ability to submit a certificate request and download the resulting PFX certificate file. Given the power involved in allowing a user to generate his or her own subject name and automatically receive a certificate in this subject name, Keyfactor recommends that permissions for this feature are only given to very trusted users and/or that you consider making use of Keyfactor Command workflow
Certificate enrollment refers to the process by which a user requests a digital certificate. The user must submit the request to a certificate authority (CA). page provides the ability to submit a certificate request and download the resulting PFX certificate file. Given the power involved in allowing a user to generate his or her own subject name and automatically receive a certificate in this subject name, Keyfactor recommends that permissions for this feature are only given to very trusted users and/or that you consider making use of Keyfactor Command workflow![]() A workflow is a series of steps necessary to complete a process. In the context of Keyfactor Command, it refers to the workflow builder, which allows you automate event-driven tasks when a certificate is requested or revoked. with a RequireApproval step (see Adding, Copying or Modifying a Workflow Definition).
A workflow is a series of steps necessary to complete a process. In the context of Keyfactor Command, it refers to the workflow builder, which allows you automate event-driven tasks when a certificate is requested or revoked. with a RequireApproval step (see Adding, Copying or Modifying a Workflow Definition).
You can expand and collapse sections of the PFX enrollment page by clicking on the plus/minus icon to the left of each section title.
To request a certificate via PFX:
- In the Keyfactor Command Management Portall, browse to Enrollment > PFX Enrollment.
-
If you are enrolling from an enterprise CA
 A certificate authority (CA) is an entity that issues digital certificates. Within Keyfactor Command, a CA may be a Microsoft CA or a Keyfactor gateway to a cloud-based or remote CA., select a certificate template from the Template dropdown. The templates are organized by configuration tenant
 A grouping of CAs. The Microsoft concept of forests is not used in EJBCA so to accommodate the new EJBCA functionality, and to avoid confusion, the term forest needed to be renamed. The new name is configuration tenant. For EJBCA, there would be one configuration tenant per EJBCA server install. For Microsoft, there would be one per forest. Note that configuration tenants cannot be mixed, so Microsoft and EJBCA cannot exist on the same configuration tenant. (formerly known as forest
 An Active Directory forest (AD forest) is the top most logical container in an Active Directory configuration that contains domains, and objects such as users and computers.). If you have multiple configuration tenants and templates with similar names, be sure to select the template in the correct configuration tenant. If you are enrolling from a standalone CA, check the Use a stand-alone CA box instead of selecting a template.
Figure 105: Select a Certificate Template
Note: The supported key algorithms for a certificate template are determined based on global template policy, individual template policy, and the template's supported algorithm.When configuring template-level policies for key information, only key sizes that are valid for the algorithm will be available, according to the global template policy, the template policy, and the supported key sizes. For PFX and CSR generation, you will be offered the option to select the Key Algorithm and Key Size for the enrollment in dropdowns if the selected template with applied policy settings supports more than one of these. If, after applying Keyfactor Command policy to the returned template there is only one value for key algorithm and size, these dropdowns will be grayed out. If for some reason an algorithm comes back as supported, but no key sizes are available, that algorithm should not appear. When selecting an ECC
 Elliptical curve cryptography (ECC) is a public key encryption technique based on elliptic curve theory that can be used to create faster, smaller, and more efficient cryptographic keys. ECC generates keys through the properties of the elliptic curve equation instead of the traditional method of generation as the product of very large prime numbers. key size
 The key size or key length is the number of bits in a key used by a cryptographic algorithm., the curve for that key size will be displayed.Tip: The check box for stand-alone CAs only appears if you have a stand-alone CA configured for enrollment.
Figure 106: PFX Enrollment for Stand-Alone CA
Tip: If you select an ECC template, the elliptic curve algorithm for the template appears below the Template dropdown.
Figure 107: PFX Enrollment for ECC Template Displaying Elliptic Curve
-
Select the Certificate Authority from which the certificate should be requested. Only CAs that have the selected template available for enrollment or are standalone, if you check the stand-alone CA box, will be shown.
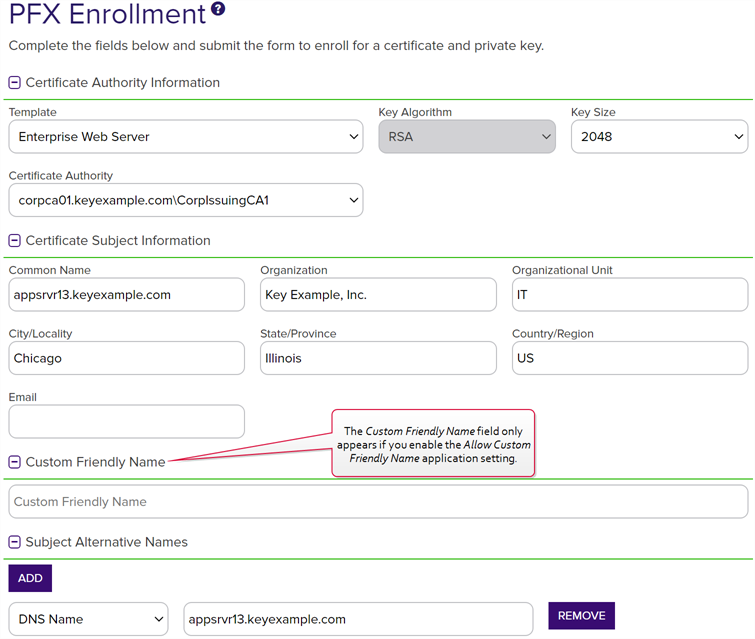
Figure 108: PFX Enrollment
Note: If a system-wide or template-level regular expression exists for a subject part or SAN The subject alternative name (SAN) is an extension to the X.509 specification that allows you to specify additional values when enrolling for a digital certificate. A variety of SAN formats are supported, with DNS name being the most common., and the subject part or SAN is left blank, the regular expression will be applied to an empty string for that part. For example, if you have a regular expression on organization, but do not supply an organization, the regular expression will be applied to a blank string as if that were supplied as the organization
 -
In the Certificate Subject Information section of the page, populate the fields as appropriate for the certificate being requested. Although Keyfactor Command does not strictly require the Common Name, the product does ship with a default regular expression requiring a value for this field since it is typical for a CA to require this unless the template is set to populate the subject from Active Directory. This regular expression may have been altered in your environment (see the below note).
Note: Some subject fields may be automatically populated by system-wide or template-level enrollment defaults. You may override the system-populated data, if desired. Any system-wide or template-level regular expressions will be used to validate the data entered in the subject fields. System-wide or template-level policies will affect the request. For more information, see Certificate Template Operations. Subject data may also be overridden after an enrollment request is submitted either as part of a workflow (see Update Certificate Request Subject\SANs for Microsoft CAs) or using the Subject Format application setting (see Application Settings: Enrollment Tab). - If enabled, add a friendly name in the Custom Friendly Name section of the page. This section only appears if the Allow Custom Friendly Name application setting is set to True. If the Require Custom Friendly Name application is set to True, a value is required in this field. For more information, see Application Settings: Enrollment Tab.
-
In the Subject Alternative Names (SANs) section of the page, add SANs if needed. If the RFC 2818 compliance option has been enabled for the template (see Certificate Template Operations), the first SAN field will automatically populate with a DNS
 The Domain Name System is a service that translates names into IP addresses. SAN matching the CN
 A common name (CN) is the component of a distinguished name (DN) that represents the primary name of the object. The value varies depending on the type of object. For a user object, this would be the user's name (e.g. CN=John Smith). For SSL certificates, the CN is typically the fully qualified domain name (FQDN) of the host where the SSL certificate will reside (e.g. servername.keyexample.com or www.keyexample.com). when you enter the CN be set to Read Only. Click the Add button to add SAN fields.Important: If the template you selected has the RFC 2818 compliance setting enabled, the DNS name will be automatically populated with the Common Name
 A common name (CN) is the component of a distinguished name (DN) that represents the primary name of the object. The value varies depending on the type of object. For a user object, this would be the user's name (e.g. CN=John Smith). For SSL certificates, the CN is typically the fully qualified domain name (FQDN) of the host where the SSL certificate will reside (e.g. servername.keyexample.com or www.keyexample.com). (CN) and will be set to read only.
The SAN field supports:
-
DNS name
-
IP version 4 address
-
IP version 6 address
-
User Prinicpal Name
-
Email

Figure 109: PFX Enrollment: SAN Options
This field is not required unless the RFC 2818 compliance option has been configured in the template policy.
-
-
If template-specific enrollment fields have been defined (see Enrollment Fields Tab) for the selected template, the fields will display in the Additional Enrollment Fields section. Additional enrollment fields have a data type of either string or multiple choice. String fields will appear as a text box; Multiple choice fields will appear as a dropdown. All additional enrollment fields are required.

Figure 110: Populate Enrollment Fields
-
In the Certificate Metadata
 Metadata provides information about a piece of data. It is used to summarize basic information about data, which can make working with the data easier. In the context of Keyfactor Command, the certificate metadata feature allows you to create custom metadata fields that allow you to tag certificates with tracking information about certificates. section of the page, populate any defined certificate metadata fields (see Certificate Metadata and Certificate Template Operations) as appropriate for the template. These fields may be required or optional depending on your metadata configuration. Required fields will be marked with *Required next to the field label. Any completed values will be associated with the certificate once it has been imported into Keyfactor Command. The order in which the metadata fields appear can be changed (see Sorting Metadata Fields).
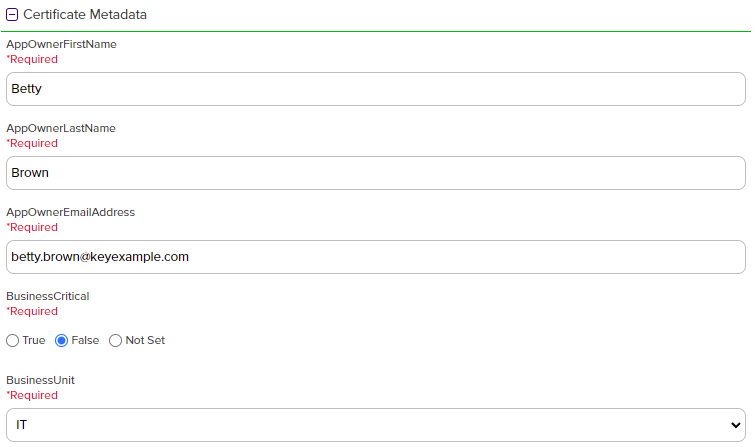
Figure 111: Populate Metadata Fields
-
If enabled, in the Password section of the page, check the Use Custom Password box and enter and confirm a custom password to use in securing the PFX file. This section only appears if the Allow Custom Password application setting is set to True. The value in the Password Length field in application settings is shown for guidance when entering a password. For more information about both of these settings, see Application Settings: Enrollment Tab.

Figure 112: Set a Custom Password
-
In the Certificate Delivery Format section of the page, select either Direct Download—to download the certificate immediately—or Install into Certificate Stores—to schedule the certificate to be added to a configured certificate store. If you do not have any configured certificate stores, the Install into Certificate Stores option will not appear.
 Direct Download
If you selected Direct Download, choose whether to include the certificate chain with the returned certificate by toggling Include Chain. If you toggle Include Chain to on, choose a Chain Order and specify either End Entity First or Root First order. The option to specify the order will only be available if the selected format supports it, otherwise the order will always be End Entity First.
The Use Legacy Encryption option applies only to certificates downloaded in PFX format. If this option is toggled to On, the PFX file is encrypted using the historical algorithm (3DES/SHA1/RC2). If this option is toggled to Off, the newer algorithm set provided by Windows (AES256/SHA256/AES256) is used instead. The default for the PFX enrollment page can be set with the Use Legacy Encryption application setting (see Application Settings: Enrollment Tab). The toggle defaults to off.
The supported Formats for output are:
-
ZIP PEM (A ZIP file with individual PEM files for certificate, private key
 Private keys are used in cryptography (symmetric and asymmetric) to encrypt or sign content. In asymmetric cryptography, they are used together in a key pair with a public key. The private or secret key is retained by the key's creator, making it highly secure., and each part of the chain, if included)
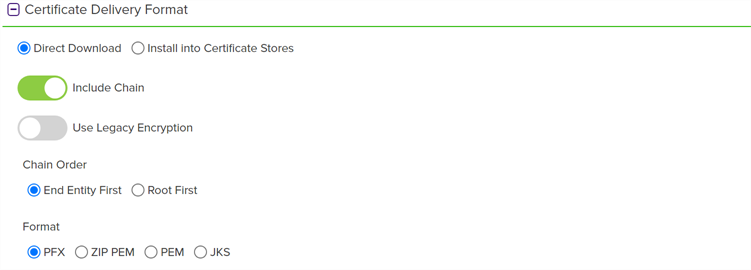
Figure 113: Delivery Format PFX Enrollment
-
Include
Click this to add the selected certificate store(s) to your certificate selection and leave the search dialog open for further searches.
-
Include and Close
Click this to close the search dialog and add the selected certificate store(s) to your certificate selection, which will then be displayed and ready for updates as per the instructions in Add to Certificate Stores.
-
Close
Click this to cancel the operation and return to the main page with no certificate stores selected.
-
Schedule when to run the job for the certificate store
In the Schedule dropdown, select a time at which the job to add the certificate to the stores should run. The choices are Immediate or Exactly Once at a specified date and time. If you choose Exactly Once, enter the date and time for the job. A job scheduled for Immediate running will run within a few minutes of saving the operation. The default is Immediate.
-
Include Certificate Stores
Open the Select Certificate Store Locations dialog again.
-
Overwrite
Check Overwrite below the grid to allow the selected certificate to overwrite any existing certificate in the same location with the same name or alias.
-
Alias
Add an Alias below the grid, if applicable, for the certificate store type. See the Information Required by Certificate Store section, below, for more information.
Note: The tab heading of the certificate location will display an alert if an alias is required for the location. -
Remove
Click Remove at the top of the grid to remove the selected certificate store from the page. The certificate will not be added to the store.
-
Supports Entry Password
If your certificate store type has this enabled, you will have the option to enter a password for the certificate entry in the certificate store on the addition of an entry into the certificate store.
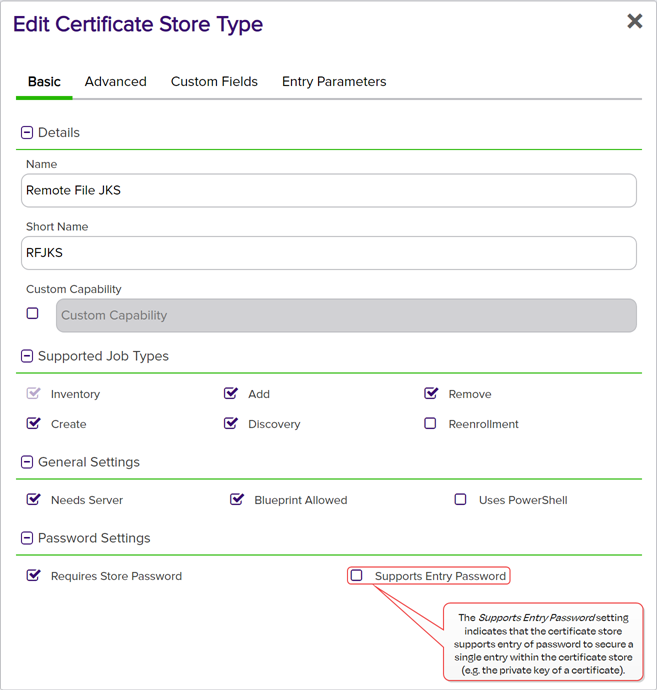
Figure 116: Certificate Store Type Configuration: Basic Tab
-
Supports Custom Alias
A value of Required indicates that a custom alias will be required when a certificate is added to a certificate store. Optional indicates an alias can be associated with the entry if desired. If your certificate store type sets this to Forbidden, the Alias field will not display when adding a certificate to a certificate store unless Overwrite is checked on the add page. In this case, you’re not associating an alias with the certificate you’re adding to the store but rather specifying the alias of the certificate already in the store that you wish to replace (in function) with the new certificate you’re adding.
The format of custom alias values varies depending on the certificate store type. In many cases, the alias is the thumbprint of the certificate. In some cases, it’s the file name of the certificate file or a custom alias provided at the time the certificate was added to the certificate store. For instance:
-
For an Amazon Web Services (AWS) store, the alias is the internal ID assigned by Amazon (the Amazon resource number or ARN). Provide the entire contents of the Alias/IP from this field when entering an alias for overwrite. For example:
arn:aws:acm:us-west-2:220531701668:certificate/88e5dcfb-a70b-4636-a8ab-e85e8ad88780 -
For F5 stores using the Keyfactor custom-built F5 Certificate Store Manager extension (see Installing Custom-Built Extensions), the alias is the file name used to store the file in the device file system, minus the extension (e.g. use alias MyFile for a file named MyFile.crt). Aliases should be entered without spaces. Note that certificate names are case sensitive.
Note: Keyfactor Command will automatically strip out any spaces between the octets in thumbprints in the alias field, so it does not matter whether you enter the thumbprint with or without spaces.Tip: When adding a certificate to a certificate store, you have the option to overwrite an existing certificate with the current certificate. If you choose this option, you will need to provide the alias of the certificate you wish to overwrite. Find the alias values by navigating to Management Portal > Certificates > Certificate Search. Select the certificate you wish to overwrite and double-click, or click Edit, from the grid header or right-click menu. Choose the Locations tab and double-click on the Location Type (this must have a number other than zero in the Count column) to open the details dialog. The Alias field holds the information that may be required for an overwrite.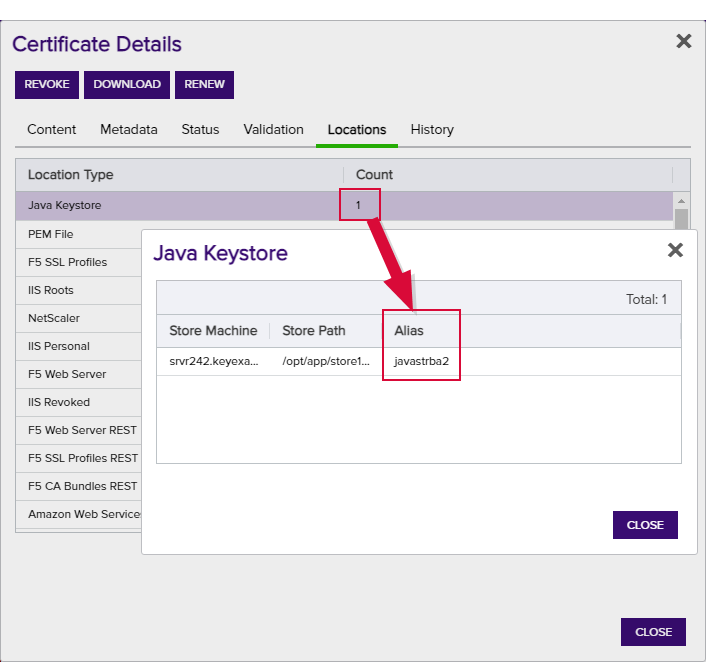
Figure 117: Example: Certificate Location Details for a JKS Location
-
-
Private Key Handling
When adding a certificate to a certificate store, if you select a certificate that does not have an associated private key, certificate stores with this option set to Required will not appear as available stores to which the certificate can be added. If this option is set to Forbidden and the selected certificate has a private key, the private key will be ignored and only the public key
 In asymmetric cryptography, public keys are used together in a key pair with a private key. The private key is retained by the key's creator while the public key is widely distributed to any user or target needing to interact with the holder of the private key. will be delivered to the target.Note: Private keys are always available in PFX Enrollment.
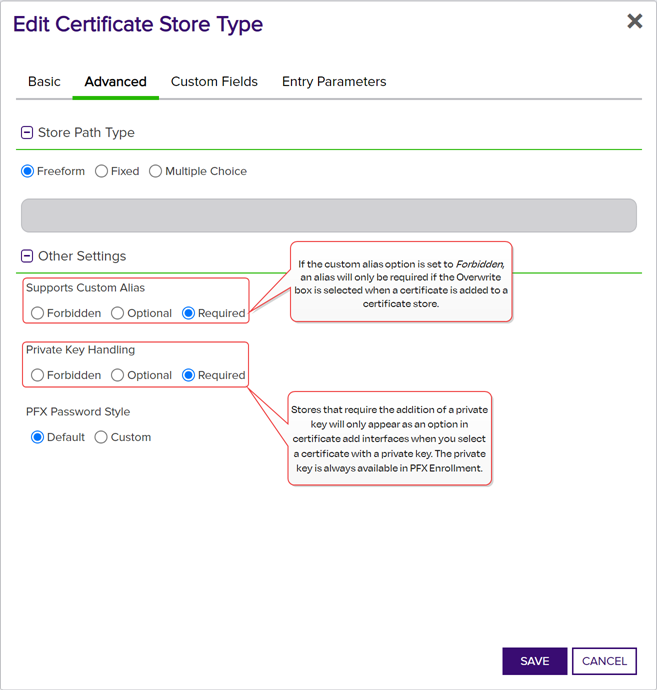
Figure 118: Certificate Store Type Configuration: Advanced Tab
-
Entry Parameters
Not all certificate store types will have entry parameters. The ones shown in Figure 119: Certificate Store Type Configuration: Entry Parameters Tab are for the custom Windows Certificate type for the Keyfactor custom-built IIS Certificate Store Manager extension (see Installing Custom-Built Extensions).
-
At the bottom of the page, click Enroll to begin the certificate request process.
-
If the request completes successfully, you'll see a success message. When the certificate is enrolled and issued the message will state the download format type, if the private key was included in the downloaded certificate, if the certificate chain was included in the downloaded certificate. If private key was not retained for the downloaded certificate, no password will be displayed a message will state that the private key and certificate can be obtained from the certificate search page.
-
You'll be prompted by your browser to begin download of your certificate unless you chose to install it directly into a certificate store. If you’ve configured PFX enrollment to use Windows authentication (the default) and have not selected the option to enter a custom password, you’ll see a one-time password that has been generated to secure the PFX file. You will need this password in order to open the PFX file.
-
If you’ve configured the Keyfactor Command Management Portal to use basic authentication and you’ve configured the Use Active Directory Password application setting option to True, the message will indicate that the PFX file can be opened using the Active Directory domain password of the user making the request. For more information about configuring basic authentication versus Windows authentication, see Application Settings: Enrollment Tab.
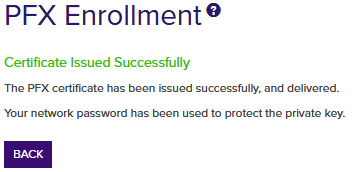
Figure 120: PFX Enrollment Completed Successfully—Network Password Used
Note: This option does not work when you authenticate to the Management Portal using Kerberos because Keyfactor Command does not have access to your credentials to apply your password to the PFX file. -
If the template you selected requires approval at the Keyfactor Command workflow level, you'll see a message that your request is suspended and is awaiting one or more approvals. The user(s) responsible for approving the request will be notified (if the workflow has been configured this way, see Adding, Copying or Modifying a Workflow Definition). You can use the My Workflows Created by Me tab (see Workflows Created by Me Operations) to check on the status of your request. If the Management Portal feature has been configured to send notification alerts when a certificate is issued following approval, you may receive an email message when your certificate is available for download. The email message may contain a download link. See Issued Certificate Request Alerts.
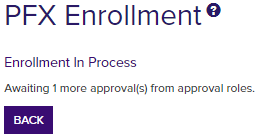
Figure 121: PFX Enrollment Completed Successfully—Awaiting Workflow Approval(s)
-
If the template you selected requires manager approval at the CA level, you’ll see a message that your request is pending. The user responsible for approving issuance of pending certificates will be notified (if that Management Portal feature is configured, see Pending Certificate Request Alerts). You can visit the Certificate Requests page (see Certificate Requests) to check on the status of your pending request and certificate search (see Certificate Search and Collections) to complete the certificate download. If the Management Portal feature has been configured to send notification alerts when a pending certificate request is approved or denied, you may receive an email message when your certificate is available for download. The email message may contain a download link. See Issued Certificate Request Alerts and Denied Certificate Request Alerts.

Figure 122: PFX Enrollment Completed Successfully—Pending Status
-
If you have any certificate stores defined, you may opt to install the certificate directly into one or more certificate stores on enrollment. If you choose to do this, the certificate will not be available for download on this page.
To install a certificate into a certificate store, select the Install into Certificate Stores radio button and then click the Include Certificate Stores button. This will cause the Select Certificate Store Locations dialog to appear. Make your certificate store selections in this dialog as described in Select Certificate Store Locations, below, and click Include and Close. You will then see some additional fields on the enrollment page. Populate these as per Add to Certificate Stores and Information Required for Certificate Stores, below.
The Select Certificate Store Locations dialog allows you to run queries against your certificate store list to select which store(s) to deploy a selected certificate to. Check the box next to each certificate store location to which you want to distribute the certificate.
The actions on the Select Certificate Store Locations dialog are:
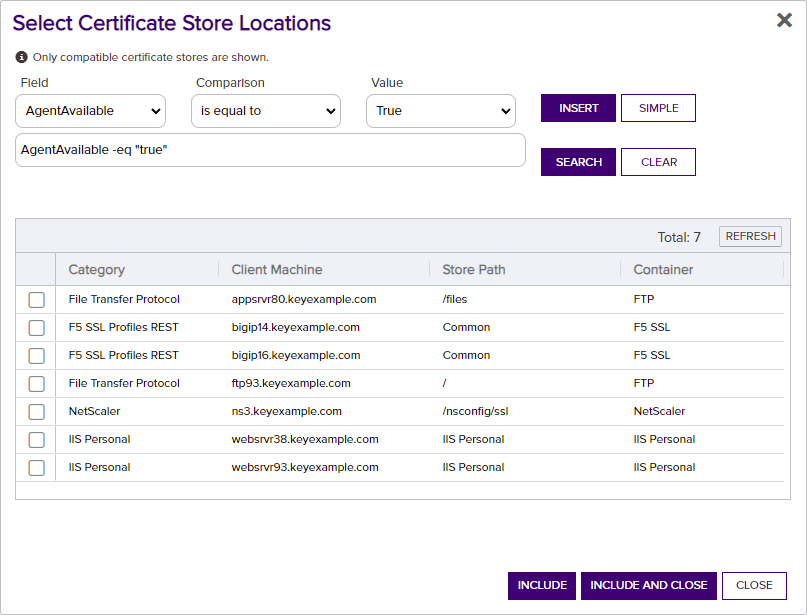
Figure 114: Select Certificate Store Locations Dialog
The additional fields that appear on the page once you select at least one certificate store to distribute your certificate to include a grid section with a series of tabs that displays a tab for each type of certificate store selected with a list of the selected stores under each tab.
Above this section are global options that apply to the add job as a whole:
For each selected certificate store you can apply the following actions:
You may return to the Select Certificate Store Locations dialog by clicking Include Certificate Stores above the grid. The current selections will be retained.
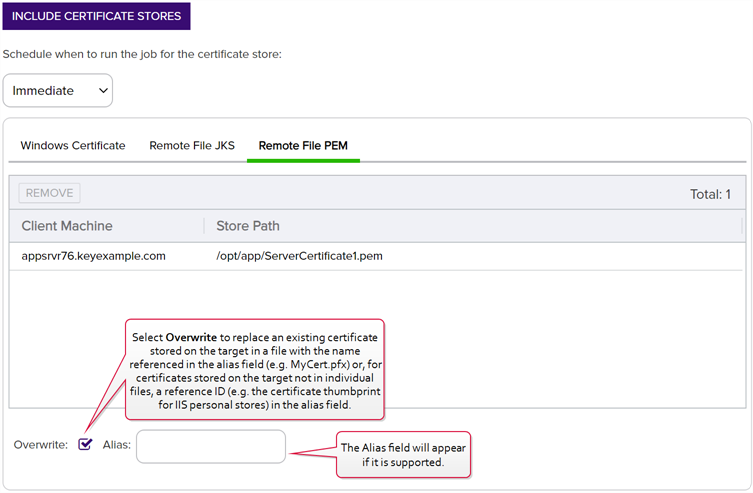
Figure 115: PFX Enrollment: Certificate Delivery Format
Each type of certificate store has different requirements for providing an alias or other additional information.
The certificate store type fields that are relevant to certificate store use are:
You can also find the help icon at the top of the page next to the Log Out button. From here you can choose to open either the Keyfactor Command Documentation Suite at the home page or the Keyfactor API Endpoint Utility.
